Potatoes are one of those vegetables that are surprisingly easy to grow at home. You don’t even need a traditional garden bed to grow a good crop.
This post may contain affiliate links.
If you have a sunny spot on a patio, deck, or balcony, you can grow potatoes in a bag or other large container.
Growing potatoes in the ground gives you plenty of room for a larger crop, while growing them in bags makes harvesting especially easy and is a great option when garden space is limited.
Here’s how to grow potatoes both ways.
Choose the Right Seed Potatoes
Start with certified seed potatoes rather than potatoes from the grocery store. Seed potatoes are grown specifically for planting and are less likely to carry diseases.
There are many varieties to choose from, including:
- Yukon Gold – creamy, buttery potatoes that are excellent for baking, roasting, and mashing
- Russet – a classic choice for baking and fries
- Red Norland – an early variety with red skin and delicious flavor
- Kennebec – a versatile, productive variety that’s good for storing
- Purple varieties – fun to grow and add beautiful color to meals
If you’re growing in a bag, early- or mid-season varieties are particularly convenient because they don’t require quite as long a growing season.
Prepare the Potatoes for Planting
If your seed potatoes are small, you can plant them whole.
Larger potatoes can be cut into pieces, but make sure each piece has at least one or two eyes. Let freshly cut pieces dry for a day or two before planting so the cut surface can form a protective layer.
You can also sprout your potatoes before planting. This is sometimes called chitting and can give them a head start.
How to Grow Potatoes in the Ground
Choose a location that receives plenty of sunlight. Potatoes grow best in loose, well-drained soil.
1. Prepare the soil
Work compost or other organic matter into the planting area. Potatoes need soil that drains well because soggy conditions can cause the tubers to rot.
Avoid compacted soil. Loose soil makes it much easier for the developing potatoes to expand.
2. Plant the seed potatoes
Dig a trench or individual planting holes about 4 to 6 inches deep.
Place the seed potatoes with the eyes facing upward and space them about 12 inches apart. If you’re planting in rows, leave roughly 2 to 3 feet between rows when you have the space.
Cover the potatoes with several inches of soil.
3. Hill the potatoes
This is one of the most important parts of growing potatoes.
As the plants grow, gradually add soil around the base of the plants. Leave the top portion of the foliage exposed.
Continue adding soil as the plants get taller.
This process, called hilling, gives the developing potatoes more room and keeps them covered so they aren’t exposed to sunlight.
You can also use straw or another suitable mulch as part of the hilling process.
4. Keep them watered
Potatoes need consistent moisture while they’re growing and developing tubers.
Water deeply when needed rather than giving the plants a little water every day. Try to keep the soil evenly moist without leaving it waterlogged.
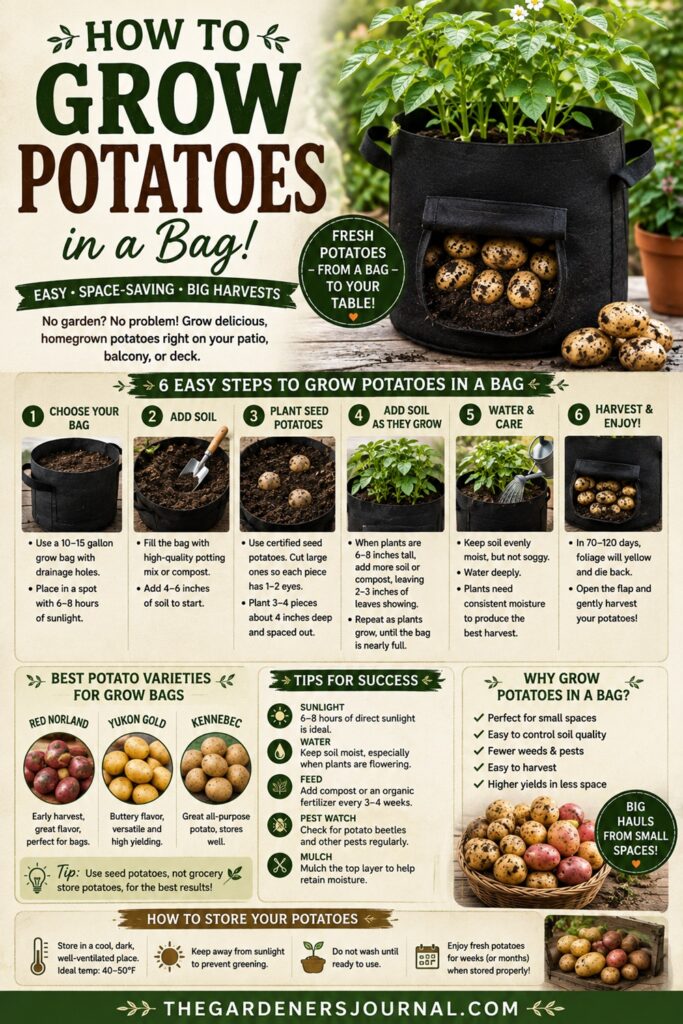
How to Grow Potatoes in a Bag
Growing potatoes in a bag is perfect if you don’t have much garden space.
A 10- to 15-gallon grow bag works well for growing a small crop. Choose a sturdy container with good drainage.
1. Add a few inches of soil
Fill the bottom of the bag with about 4 to 6 inches of good-quality potting soil mixed with compost.
Don’t fill the entire bag right away. You’ll be adding more soil as the plants grow.
2. Plant your potatoes
Place several seed potatoes on top of the soil, leaving some space between them.
For a 10- to 15-gallon bag, three or four seed potatoes is a reasonable starting point.
Cover them with about 3 to 4 inches of soil.
3. Add soil as the plants grow
Once the potato plants have grown several inches above the soil, add more soil around them.
Continue this process throughout the growing season, always leaving some of the foliage exposed.
This is essentially the container version of hilling potatoes.
4. Water regularly
Grow bags can dry out more quickly than garden soil, especially during hot weather.
Check them regularly and water deeply when the soil begins to dry. Make sure excess water can drain freely from the bottom of the bag.
5. Harvest
One of the best things about growing potatoes in a bag is how easy they are to harvest.
When the foliage begins to yellow and die back, the potatoes are usually approaching maturity.
For new potatoes, you can harvest earlier while the plants are still green.
For mature potatoes, allow the foliage to die back and then give the skins some time to toughen before harvesting.
With a grow bag, you can simply dump the contents onto a tarp or into a wheelbarrow and collect your potatoes.
It’s almost like a treasure hunt.
Growing Potatoes in the Ground vs. in a Bag
Both methods work well, but each has its advantages.
Growing potatoes in the ground
Best for:
- Larger gardens
- Growing larger quantities
- Long-term garden beds
- Gardeners who have plenty of space
Garden-grown potatoes have plenty of room to spread, and you can plant several rows for a substantial harvest.
Growing potatoes in a bag
Best for:
- Small gardens
- Patios and decks
- Balconies
- Renters
- Beginners
- Anyone who wants easy harvesting
Grow bags also make it easier to control the soil you’re growing in.
Tips for a Better Potato Harvest
A few simple things can make a big difference.
Give potatoes plenty of sun. Aim for at least 6 hours of direct sunlight each day.
Keep the soil loose. Compacted soil can restrict tuber development.
Don’t let potatoes sit in soggy soil. Good drainage is essential.
Keep tubers covered. Potatoes exposed to sunlight can turn green, so continue hilling as needed.
Water consistently. Uneven watering can contribute to problems such as cracked or misshapen potatoes.
Start with healthy seed potatoes. This is one of the easiest ways to get your plants off to a good start.
When to Harvest Potatoes
The timing depends on what you’re looking for.
For new potatoes, you can gently dig around the plants and harvest some small potatoes while the plants are still growing.
For mature potatoes, wait until the foliage has turned yellow and begun to die back. Once the plants have died back, you can carefully dig up the potatoes.
Use a garden fork rather than digging directly with a shovel whenever possible. Insert it well away from the plant and gently loosen the soil so you don’t accidentally spear your potatoes.
If you’ve grown them in a bag, harvesting is even easier.
Just empty the bag and start looking.
How to Store Homegrown Potatoes
After harvesting, gently brush off excess soil.
Don’t wash the potatoes before storing them. Allow them to cure in a cool, dark, dry, well-ventilated place for several days.
Once they’re cured, store them somewhere cool, dark, and well ventilated.
Avoid storing potatoes in direct sunlight, and don’t refrigerate them unless you have a specific reason to do so.
Grow Potatoes Wherever You Have the Space
One of the things I love about growing potatoes is that you don’t need a huge garden to do it.
If you have a garden bed, plant them right in the ground.
If you have a patio or just a little extra space, grab a grow bag.
Either way, there’s something incredibly satisfying about digging into the soil and finding potatoes you grew yourself.
And if you’ve never grown them in a bag before, I’d definitely give it a try. The harvest is probably the most fun part.
Follow my gardening board on Pinterest.